Testing with Loadster Engine
If you’re load testing on a private network that’s not reachable from Loadster’s cloud regions, you will need to host your own engines to actually generate the load. Don’t worry, this is pretty easy and there’s no additional charge.
How It Works
Loadster Engine is a containerized process that you can run on your own network. It makes an outbound connection to the Loadster API to listen for instructions.
When you launch a test, the engine roars to life, spinning up bots and generating load on your site. As the test runs, the engine streams back realtime data that Loadster displays in the live charts on your test dashboard.
Installing Loadster Engine
Loadster Engine runs on any platform that supports Docker. This includes recent versions of Windows, Mac, and Linux.
In the past, we shipped platform-specific installers for Mac and Windows, but have since consolidated everything to Docker to make it easier to ensure the proper dependencies and versioning across all the platforms.
Hardware
Load testing can require a lot of CPU cycles, so we recommend that you install the engine on a virtual or physical machine with at least 2 CPU cores, and preferably more. You should also have at least 2 GB of RAM free. A fast network connection is essential.
Obviously, the more powerful a machine you run the engine on, the more bots you will be able to reliably run with your self-hosted engine. An overloaded engine can report incorrect timings and invalidate your test results, so keep an eye on the engine’s CPU utilization as your tests run, and don’t undersize the hardware.
Running With Docker
To run Loadster Engine, simply pull and run the public Docker image.
$ docker pull quay.io/loadster/loadster-engine
$ docker run -t --env LOADSTER_ENGINE_KEY=$ENGINE_KEY quay.io/loadster/loadster-engine
You can obtain an $ENGINE_KEY from the Settings page of your dashboard, which is necessary for
identifying the engine with Loadster’s cloud services. Each engine will need its own key, so if you run multiple engines,
don’t use the same key for each!
Playing Scripts With Loadster Engine
You can designate your self-hosted Loadster Engine as a script player in Settings, in the Scripting section.
Making your self-hosted engine the script player means that whenever you play a script in the script editor with a single bot, the traffic will originate from your self-hosted engine. This is often necessary if you’re testing a site on a private network that isn’t reachable from Loadster’s script players out in the cloud.
Connecting to localhost from a Self-Hosted Loadster Engine
Since Loadster Engine runs in a Docker container, it might have trouble reaching localhost on the host machine,
because of a gotcha with Docker networking. It turns out that localhost inside the Docker container (where your engine is
running) is actually different from localhost on the host machine.
For example, let’s say you are running your web application locally on port 8080, and running Loadster Engine as a Docker
container on the same machine. Putting localhost in your Loadster script might result in socket errors or connection
timeouts or something, because it will be trying to hit localhost inside the container instead of outside.
There’s a helpful discussion of this in a
Stack Overflow thread.
It’s not specific to Loadster, but it presents several helpful workarounds. Generally we’ve found it easiest to just change your
script to use the host’s IP address (like 192.168.0.34 for example) rather than localhost or 127.0.0.1.
Running Tests With Loadster Engine
Once you’ve installed an engine, using it is very simple. In your test scenario, just select the engine for each of your bot groups you want to run on it.
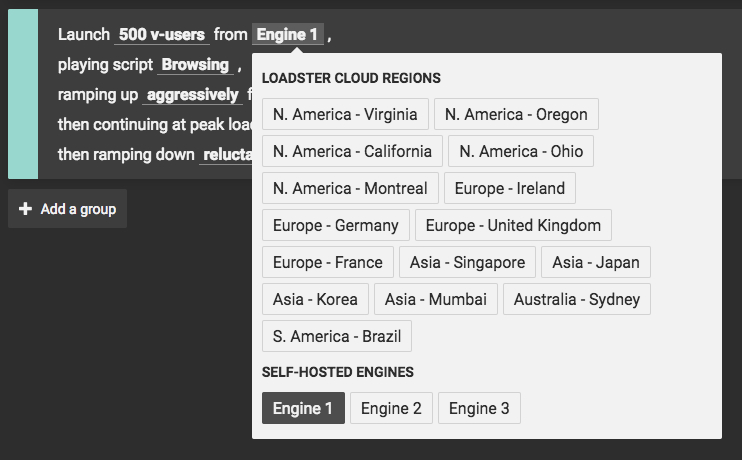
Now, when you start your test, Loadster will send instructions to that engine (via the engine key) to generate the load.
Tuning Your Operating System
Load testing is resource intensive, and Loadster Engine is a resource intensive application. It tries hard to max out the available resources, particularly CPU and network sockets. While the default settings for your OS may be fine for most things, and even for small to moderate load tests, there may be a time when you need to push your systems harder than the default settings will allow.
Tuning Windows Systems
The main resource constraint Windows suffers from is a limited range of ephemeral ports.
Loadster Engine uses ephemeral ports temporarily, to bind a socket for an outbound connection to the application or website you are testing. In a load test, you’ll sometimes need thousands of ephemeral ports per minute.
By default (as far as we can tell), most Windows systems only allow ports from 1024 to 5000 to be used for this purpose. Furthermore, it can take up to 4 minutes after a socket is closed before the port is recycled. Thus, if you run more than 1000 requests per minute for a sustained period, it is possible to run out of ephemeral ports.
When this happens, Loadster Engine sometimes reports errors like address already in use: connect that indicate it
cannot open a port because the OS is starving it.
Increasing the Ephemeral Port Range
Modern versions of Windows have a Registry key that tells what port range to allow for user processes. By default, the range is quite small. You can add or update a Registry key to modify the range.
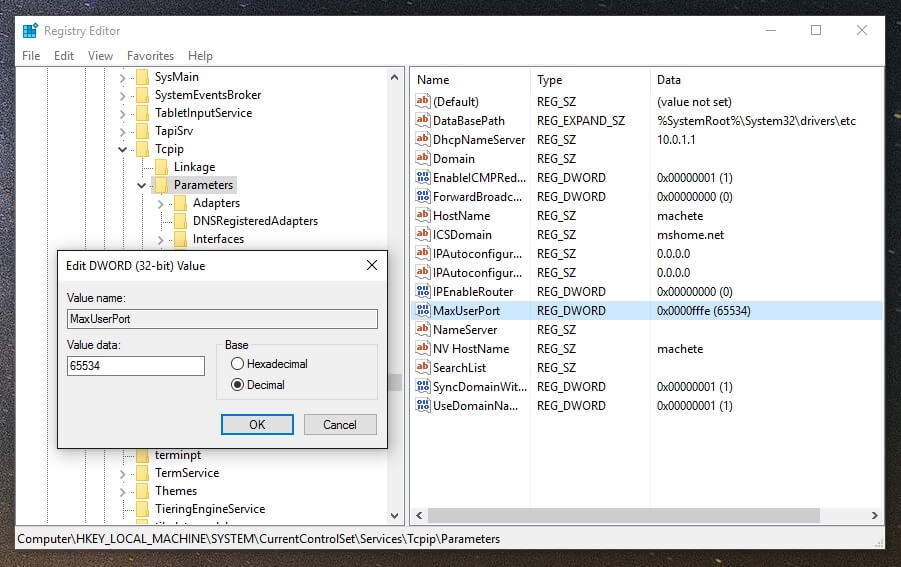
To update the Registry key:
- Run regedit.exe, as Administrator.
- Drill down to
HKEY_LOCAL_MACHINE\SYSTEM\CurrentControlSet\Services\Tcpipand right-click Parameters. - Add a DWORD (32-bit) value. Enter the name MaxUserPort, with the decimal value of 65534.
- After adding the new key, restart your system.
When your system starts up again, Windows will have a much wider range of ports to use for load testing.
Changing the TIME_WAIT Window
After a TCP connection is closed, it goes into TIME_WAIT status for a while before the OS is able to reuse the port. When running load tests, it is possible for all available outbound ports to become tied up. To avoid this, you can tell Windows to recycle the connections more aggressively.
- Run regedit.exe, as Administrator.
- Drill down to
HKEY_LOCAL_MACHINE\SYSTEM\CurrentControlSet\Services\Tcpipand right-click Parameters. - Add or update the TcpTimedWaitDelay property and give it a decimal value of 30.
- Restart your system.
Once your system starts up again, Windows will only leave connections in TIME_WAIT status for 30 seconds before recycling them, instead of 4 minutes.
Tuning Mac OS X Systems
This section has not been written yet. If you are having issues running large load tests on Loadster Engine for Mac, please contact us and we will work with you one-on-one.
Tuning Linux Systems
In our experience, most Linux distributions have default network settings that are fairly generous and sometimes not much configuration is needed unless you are really pushing the limits. However, there are a few parameters that sometimes need to be adjusted.
Maximum Open File Descriptors
One of the important settings for Linux systems processing a large amount of throughput is file-max.
This is the kernel’s limit of how many file descriptors can be open at one time. File descriptors are used for network
sockets as well as local file reading/writing, along with a few other things.
You can determine the current limit on your Linux machine with the following:
# cat /proc/sys/fs/file-maxWe suggest at least 100000 as a general guideline for load testing. To set it temporarily, run (as root):
# echo "100000" > /proc/sys/fs/file-maxSetting it permanently depends on your Linux variant, but can usually be done by editing /etc/sysctl.conf.
Ephemeral Port Range
In a load test, the Loadster Engine opens and closes many outbound HTTP connections. Each time it opens a new connection, it uses a different ephemeral port. After the connection is closed, the Linux kernel may take a little while before it can reuse that same port. Most modern Linux variants have a reasonably large range of ports from which to choose from, but if you find yourself getting errors like “address already in use”, you may need to adjust the local port range.
To determine the current local port range, run:
# cat /proc/sys/net/ipv4/ip_local_port_rangeNewer Linux systems usually have a default range of 32768 to 61000, meaning that any port number in this range can be used for outbound connections.
In most cases, you can safely change the lower bound to 10000 and the upper bound to 65000, but that really depends on what other services you are running on the machine and what other ports might be in use.
To adjust the local port range, run (as root):
# echo "10000 65000" > /proc/sys/net/ipv4/ip_local_port_rangeSetting it permanently depends on your Linux variant, but can usually be done by editing /etc/sysctl.conf.