Incidents & Notifications
When your Loadster monitor detects a problem it creates an incident that you and your team can track until the problem is resolved.
Loadster can notify you when the incident is opened and resolved through your choice of channels. Available channels include email, robocalls, text messages, and integrations with your other apps and services.
Incident Escalation & Resolution
Loadster opens an incident whenever a monitor that was previously passing starts failing. It closes the incident when the monitor again starts passing.
By default, a single failing cycle is enough to open an incident, and a single passing cycle is enough to resolve it. If this isn’t appropriate for your situation, so you can change these thresholds with the escalation settings at the top of each monitor.
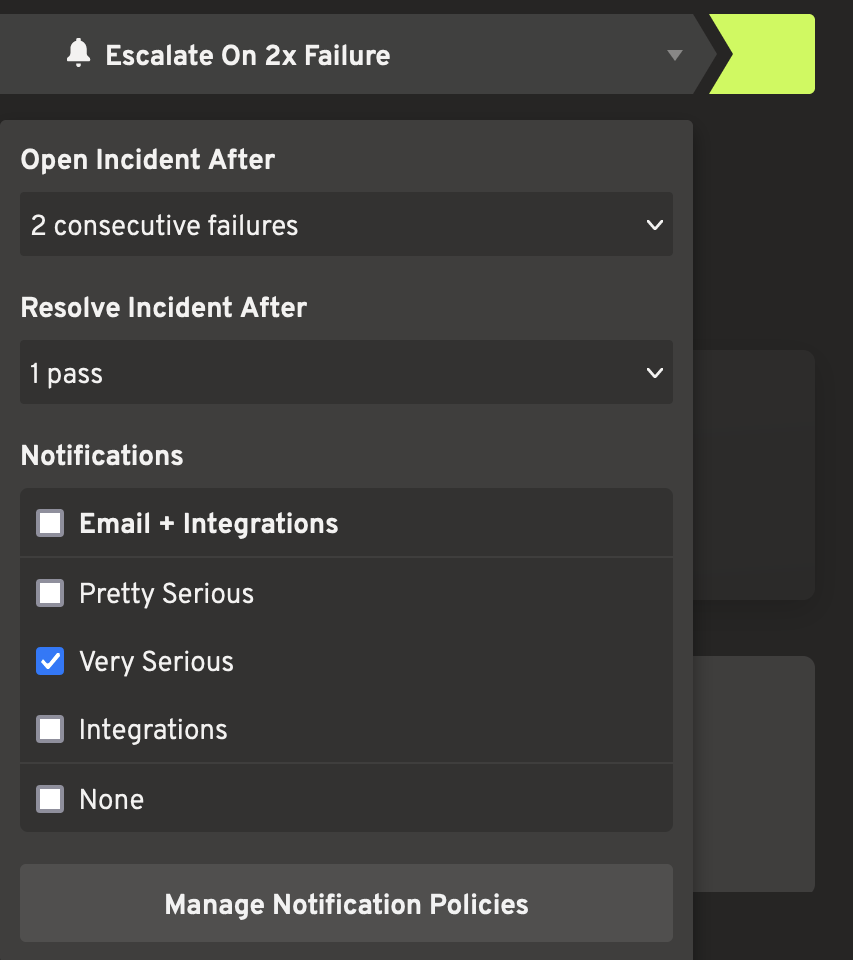
If you only want an incident after multiple failed cycles, you can change the monitor’s escalation threshold to only create an incident after 2, 3, or more consecutive failures.
Similarly, you can change the resolution threshold to require multiple consecutive passing cycles before closing an incident.
Notification Policies
You can use notification policies to change how Loadster notifies you about monitoring incidents. Each monitor can have its own notification policies.
Standard Notification Policies
The standard notification policies are “Email & Integrations” and “None”.
The “Email & Integrations” standard policy simply emails everyone on your Loadster team when an incident is opened and again when it’s resolved, and also calls any monitoring integrations that you have connected.
The policy called “None”, as you might have guessed, doesn’t notify at all. The monitor will still track incidents and you’ll be able to view these incidents on the dashboard, but you won’t be notified about them.
Custom Notification Policies
In addition to the standard policies, you can create custom notification policies for better control over how and when you are notified of incidents.
To create a custom notification policy, expand the Notification Policies drawer and add a new policy.
Setting up notification policy actions
A notification policy’s actions are the actions it takes when an incident is opened and closed. You can add multiple actions to the same notification policy, and all actions will be triggered.
Actions include:
- Send an email
- Send an SMS (text message)
- Make a robocall (voice call)
- Call an integration
Keep in mind that text message and robocall notifications will only be made to users on your team who have entered and confirmed a phone number on the Account page. Everyone who wants to receive these has to enter their own phone number and opt in individually. There’s no way to add phone numbers for your other team members because the phone carriers don’t want to enable spam.
Integrations can be configured on the Integrations page by any admin user on your team. Once an integration has been enabled you’ll be able to use it in your notification policies.
Customizing the notification policy schedule
A notification policy also has a schedule of when to notify about incidents. It can notify immediately when an incident is opened, or only after it has been open for a set number of minutes.
Sometimes monitors recover on their own, so you might not want to get notified of minor incidents unless the condition persists for a while.
You can configure a notification policy to repeat the notifications while an incident remains open. If you enable multiple notifications, they’ll repeat at increasing intervals with a sort of exponential back-off timing function.
Designating maintenance windows
Notification policies can have maintenance windows during which they will not send notifications.
For example, if your site has scheduled maintenance every week on Sunday at midnight, you can set a maintenance window for that time so nobody gets bothered about monitoring incidents during that time. The monitors will still run during this window but no notifications will be sent out.
Similarly, if you have a less critical part of your site and you want it monitored but you don’t want to get woken up about any issues, you can set a maintenance window every night so you can get your beauty rest.
Each monitor can have different notification policies associated, so it’s okay to have maintenance windows for some monitors but not for others.
Associating notification policies with your monitors
After you’ve created a notification policy, don’t forget to associate it with your monitors! You can do this by checking the checkbox in the list of notification policies in each monitor’s escalation settings.
It’s possible to have multiple notification policies associated with the same monitor, although your life might be simpler if you keep it to just one at a time.
Similarly, you can use the same custom notification policy with multiple monitors, and they will share the same notification actions and schedule.
Incident History
You can view open and resolved incidents on the Incidents page.
Loadster keeps a detailed history of when and why each incident was opened and resolved. From the incident, you can jump to the failed monitor cycle that triggered the incident or the passed monitor cycle that resolved it.
You can also view a timeline of notifications about that incident, so you can see who on your team has been notified and how.
Similar to the main monitoring dashboard, you can filter your incidents by monitor, status, or tag.